Seiko RC-1000
The Seiko RC-1000 came out in 1984 and has 2K of memory available to the user. The memory can be written to from a computer using RS232. The watch can store notes, phone numbers, and most importantly: a combination of scheduled and recurring alarms. The scheduled alarms go off once at a specific date and time. The recurring alarms are for a certain time on a day of the week. For instance, every Sunday at 3pm. The alarms are programmed via the serial port, although the watch still has an additional alarm settable on the watch its self, and is more like what you'd typically find on a watch: set the time, and the alarm will go off every day at that time.
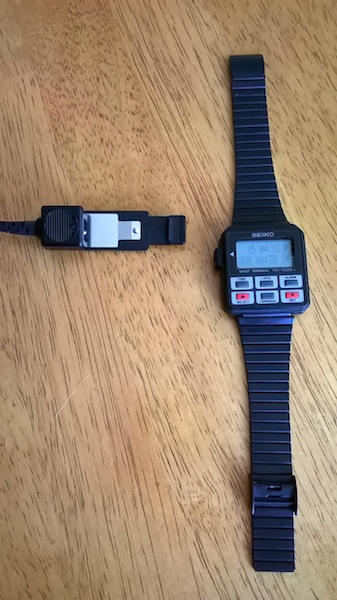
Connecting the Watch
The watch has 2 signalling pins: RX and signal ground. The signal ground is the back plate of the watch, and the RX pin is a small round contact on the left side of the watch. The watch receives at 2400 baud, 8 bits, no parity, and 2 stop bits. Since the watch has no TX pin, nothing can be read off the watch, only written to it. Whenever the watch is written to, 2051 bytes are always written. There is no incremental updates of the watch memory, it's entire memory is overwritten on every update.
Protocol/Memory Layout
The watch screen is capable of displaying 2 lines of 12 characters, for 24 characters per screen. Conceptually, the 2K of watch memory is broken up into 80 screens of data, and a sort of table of contents of the screens as a header.Within the pool of screens, there can be "categories". When in Terminal mode on the watch, the Terminal button can be pressed repeatedly to switch between categories. Within each displayed category, the Select button can be used to scroll through screens within that category.
The table of contents at the beginning of memory is twelve entries of 12bit offsets to the start of each category, and 4 flag bits, making each entry 16bits long. Here is an example of the beginning part of a memory transfer:
00000000  00 4c 00 00 00 32 20 64  4c 00 00 00 00 00 00 00  |.L...2 dL.......|
00000010  00 00 00 00 00 00 00 00  00 00 4c 2d 2d 4d 59 20  |..........L--MY |
00000020  4d 45 4d 4f 53 2d 2d 2d  2d 2d 2d 2d 2d 2d 2d 2d  |MEMOS-----------|
00000030  2d 2d 2d 64 74 69 74 6c  65 31 20 20 20 20 20 20  |---dtitle1      |
00000040  63 6f 6e 74 65 6e 74 31  20 20 20 20 4c 20 20 20  |content1    L   |
00000050  50 48 4f 4e 45 20 20 20  20 20 20 4e 55 4d 42 45  |PHONE      NUMBE|
00000060  52 53 20 20 20 64 74 65  73 74 20 20 20 20 20 20  |RS   dtest      |
00000070  20 20 35 35 35 2d 35 35  35 2d 35 35 35 35 4c 20  |  555-555-5555L |
00000080  20 20 57 45 45 4b 4c 59  20 20 20 20 20 20 41 4c  |  WEEKLY      AL|
00000090  41 52 4d 53 20 20 20 64  73 63 68 6f 6f 6c 62 75  |ARMS   dschoolbu|
000000a0  73 20 20 20 30 20 53 55  4e 20 50 30 33 3a 31 37  |s   0 SUN P03:17|
000000b0  4c 00 00 00 00 00 00 00  00 00 00 00 00 00 00 00  |L...............|
The transfer always begins with 0x00 0x4c. Following that is the table of contents, which can be seen here:
00000000  00 4c 00 00 00 32 20 64  4c 00 00 00 00 00 00 00  |.L...2 dL.......|
00000010  00 00 00 00 00 00 00 00  00 00 4c 2d 2d 4d 59 20  |..........L--MY |
The block of 80 screens begins at location 0x1a, and all the offsets given are relative to that. So the first 16bit offset listed in the table of contents is 0, the second is 0x32, and the third is 0x2064. The top 4 bits are flags, so the 0x20 is a flag bit, and 0x64 is the offset.
00000010  00 00 00 00 00 00 00 00  00 00 4c 2d 2d 4d 59 20  |..........L--MY |
00000020  4d 45 4d 4f 53 2d 2d 2d  2d 2d 2d 2d 2d 2d 2d 2d  |MEMOS-----------|
00000030  2d 2d 2d 64 74 69 74 6c  65 31 20 20 20 20 20 20  |---dtitle1      |
00000040  63 6f 6e 74 65 6e 74 31  20 20 20 20 4c 20 20 20  |content1    L   |
This is the first category, starting at 0x1a. Each entry begins with a separating byte. 0x4c starts a category, 0x64 separates screens within a category, and 0x40 seems to mean the screen is unused. This category is titled "--MY MEMOS--" with the second line of the screen being "------------", it has one screen, with the contents "title1 " on the first line, and "content1 " on the second line. Each screen is a fixed size, there's no variable sized fields here.
Following the MY MEMOS category and its screens starts another category at 0x4c. This is the second entry in the table of contents, and shows up there with an offset of 0x32, which ix 0x4c - 0x1a:
00000040  63 6f 6e 74 65 6e 74 31  20 20 20 20 4c 20 20 20  |content1    L   |
00000050  50 48 4f 4e 45 20 20 20  20 20 20 4e 55 4d 42 45  |PHONE      NUMBE|
00000060  52 53 20 20 20 64 74 65  73 74 20 20 20 20 20 20  |RS   dtest      |
00000070  20 20 35 35 35 2d 35 35  35 2d 35 35 35 35 4c 2d  |  555-555-5555L-|
This is the " PHONE "/" NUMBERS " category, with a single screen of "test "/"555-555-5555", setup identically to the MY MEMOS category above.
The next category is the weekly alarms. Alarms are a little different. Notice above in the table of contents, this entry had an offset of 0x2064, with the top bits being flags. 0x20 indicates weekly alarms and 0x10 indicates scheduled one time alarms. Additionally, the alarms must have a fixed format for the watch to be able to interpret the time correctly. Here's the weekly alarm section starting at 0x7E (0x64 from the header + 0x1a):
00000070  20 20 35 35 35 2d 35 35  35 2d 35 35 35 35 4c 20  |  555-555-5555L |
00000080  20 20 57 45 45 4b 4c 59  20 20 20 20 20 20 41 4c  |  WEEKLY      AL|
00000090  41 52 4d 53 20 20 20 64  73 63 68 6f 6f 6c 62 75  |ARMS   dschoolbu|
000000a0  73 20 20 20 30 20 53 55  4e 20 50 30 33 3a 31 37  |s   0 SUN P03:17|
000000b0  4c 00 00 00 00 00 00 00  00 00 00 00 00 00 00 00  |L...............|
The alarm category has its 2 line, 24 byte title, and the alarm its self is broken into 2 parts: the first 12 bytes are the name of the alarm, and the second 12 bytes are the alarm time. For weekly alarms, the time must follow the form of "# DAY {A,P}HH:MM", where # is the number of the day of the week, with 0 being Sunday, 1 is Monday, and so forth. DAY is the 3 letter abbreviation of the day of the week, SUN, MON, TUE, WED, THU, FRI, SAT. {A,P} indicates AM or PM, and HH:MM is the time, with all characters set. In this case, the alarm time is "0 SUN P03:17".
Scheduled alarms must be in their own category (because the flags in the TOC must be set there), and the alarm time follows a different format: "MM/DD {A,P}HH:MM", for example: "04/12 P03:17". Otherwise they follow the same syntax as the weekly alarm in this example.
Software
I've put together a rudimentary posixy command line tool that will read a text file of categories, screens, and alarms, and write it out to the watch. To sync the watch, press the Terminal button to get to Terminal mode, then press the Lock button. The watch screen should say "RECEIVE", then the watch is ready for the transfer. When the transfer starts, the watch should beep. When the transfer ends, the watch should beep again, and switch back to the Terminal screen.Here's an example input file for the tool:
--MY MEMOS--
------------
title1
content1
title2
content2

   PHONE
  NUMBERS
test
555-555-5555

   WEEKLY
   ALARMS
schoolbus
0 SUN P03:17
Categories are separated by a blank line.
The tool can be run like so:
./seiko -s /dev/ttyUSB0 -f watch.txtHere's the source: seiko.c
Observations
Alarms can be enabled/disabled while on the Time screen by pressing Select and Set simultaneously. When alarms are enabled prior to syncing with a computer, and the sync has new alarms in it, the new alarms don't seem to be picked up until alarms are disabled and re-enabled.There doesn't seem to be a way to disable the standard watch alarm and only use the synced alarms, so make sure you set the standard watch alarm to something non-intrusive, not the default midnight.
The watch can only display upper case characters. Lower case characters can be used in the sync information, but the watch will map them to upper case.
The watch takes a BR2325 battery. After replacing the battery, if the screen is still blank, press all the gray buttons simultaneously (Time, Lock, Alarm, and Terminal). This will reset the watch. Updated April 12 2015